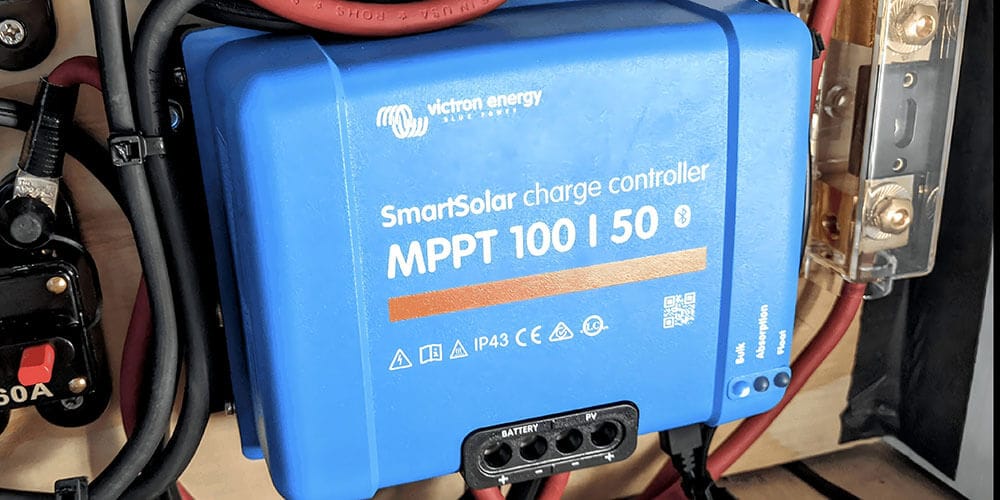
A solar charge controller regulates the voltage and current from solar panels to your battery bank. It helps prevent overcharging and prevents current from flowing back to the solar panels at night when the solar panels’ voltage is lower than that of the batteries.
There are two types of solar charge controllers: PWM (Pulse Width Modulation) and MPPT (Maximum Power Point Tracking). While PWM is simple and cheap and is usually used in small-wattage solar systems, MPPT is more expensive and more efficient in large-scale solar systems.
When designing your solar system, it’s important to know how to choose the right size for your charge controller.
In this article, we will explain how to size PWM and MPPT solar charge controllers, respectively. The calculation process includes several industry terms; in order to read smoothly, let’s learn the following glossaries. If you are familiar with these terms you can skip the glossaries section.
Glossaries
- Standard Test Conditions (STC) – STC is like a “perfect day” testing scenario where we measure solar panels using these three specific conditions: Temperature: 25°C (about 77°F) – like a nice spring day; Sunlight: 1000 watts per square meter – think bright noon sunshine; Air Mass: 1.5 (this means sunlight traveling through our atmosphere at a specific angle)
- Nominal Voltage – This is like a panel’s “personality type” – it’s the general voltage category the panel falls into. For example, when we say a panel is “24V nominal,” it’s designed to work best with 24V systems, though its actual voltage will vary during operation.
- Voc (Open Circuit Voltage) – This is the maximum voltage your panel produces when nothing is connected to it – kind of like measuring how fast your car can go when it’s in neutral. I always tell my clients to pay attention to this number because it’s crucial for safety and system design.
- Isc (Short Circuit Current) – Think of this as the maximum current your panel can produce under ideal conditions. It’s like measuring how much water can flow through a pipe when there’s nothing blocking it. This helps us design safe systems and choose the right components.
- Vmp (Voltage at Maximum Power) – This is the “sweet spot” voltage where your panel operates most efficiently – like finding the perfect speed for your car’s fuel efficiency. In our solar street lights, we carefully match this voltage to get the best performance.
- Imp (Current at Maximum Power) – Similar to Vmp, this is the current when the panel is operating at its peak efficiency. From my experience installing thousands of solar lights, this number is crucial for calculating how much real-world power you’ll get.
Table of Parameters for Regular Solar Panels
| Nominal Voltage | Number of Cells | Voc (V) | Isc (A) | Vmp (V) | Imp (A) |
| 12V | 36 cells | 21-23 | 5-7 | 17-18 | 4.5-6.5 |
| 20V | 48 cells | 29-31 | 8-10 | 24-26 | 7.5-9.5 |
| 24V | 72 cells | 44-46 | 9-11 | 36-38 | 8.5-10.5 |
How to Size a PWM Solar Charge Controller
Voltage
PWM controller is like a simple light switch – it can only turn the current on and off. It can’t transform voltage like its more sophisticated cousin, the MPPT controller.
When you choose PWM for your solar system, make sure the nominal voltage of the solar panels is the same as the nominal voltage of a battery bank.
Current
Step 1: Read the solar panel nameplate to get the Isc and the Voc of the solar panel.
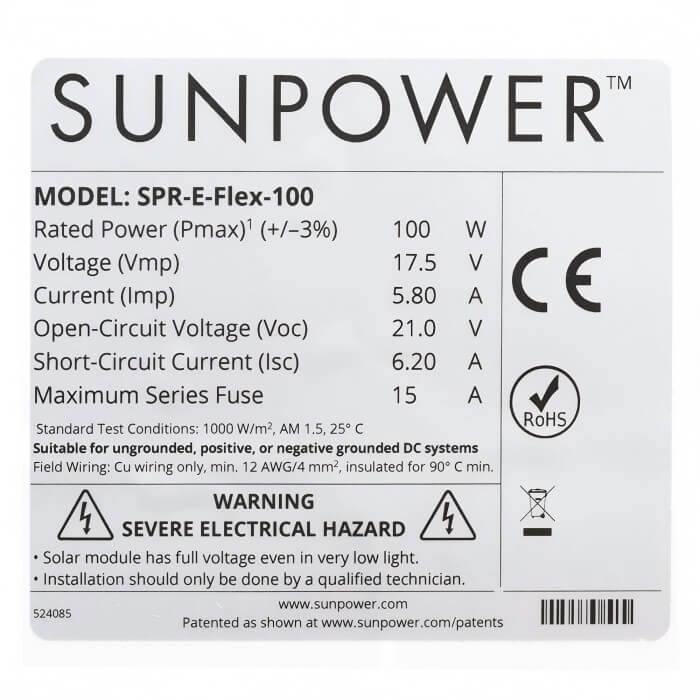
Take sunpower solar panels as an example, from which we get Voc 21V and Isc 6.2A.
From Voc 21V and together with the “table of parameters for regular solar panels,” we know it is a nominal 12V solar panel.
Step 2: figure out how many strings and parallels are in this solar panel system. For now, we assume there is only 1 string and 1 parallel.
Step 3: Multiply Isc by the number of strings
6.2 Isc x 1 string = 6.2A
Step 4: Multiply by 1.25 safety factor according to the instruction of NEC 690.8(A)(1)
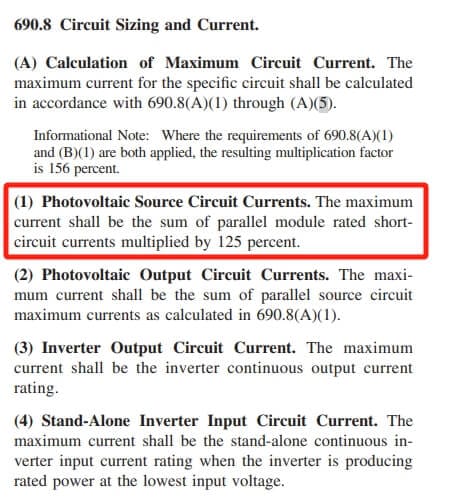
We get
6.2 Isc x 1 string x 1.25 = 7.75A
So you can choose the current load capacity of PWM to be larger than 7.75A
How to Size an MPPT Solar Charge Controller
MPPT solar charge controllers are smarter; they can harness almost all of the energy collected by solar panels. Unlike PWM types, which require the voltage of the solar panel and battery to be the same, otherwise, it will waste energy generated by a higher voltage from the solar panel, MPPT can convert high voltage from the solar panel to low voltage for battery charging and increase current. This way, the total power received by the battery bank can meet the maximum power collected by the solar panel, and there will be no energy loss.
This means we can use MPPT with a higher voltage of solar panels in the solar system.
Temperature Affects the Voltage of Solar Panels
Before we calculate the voltage for the MPPT solar charge controller, we need to declare the notable features of the solar panel.
Solar panels are made of silicon. When silicon gets cold, the voltage increases. When you check the electrical parameters on a nameplate, those parameters are all tested at Standard Test Conditions (STC), which is 25°C (77°F). However, winter is colder than 25°C (77°F). We need to check NEC Article 690 to find out the relevant temperature factor.
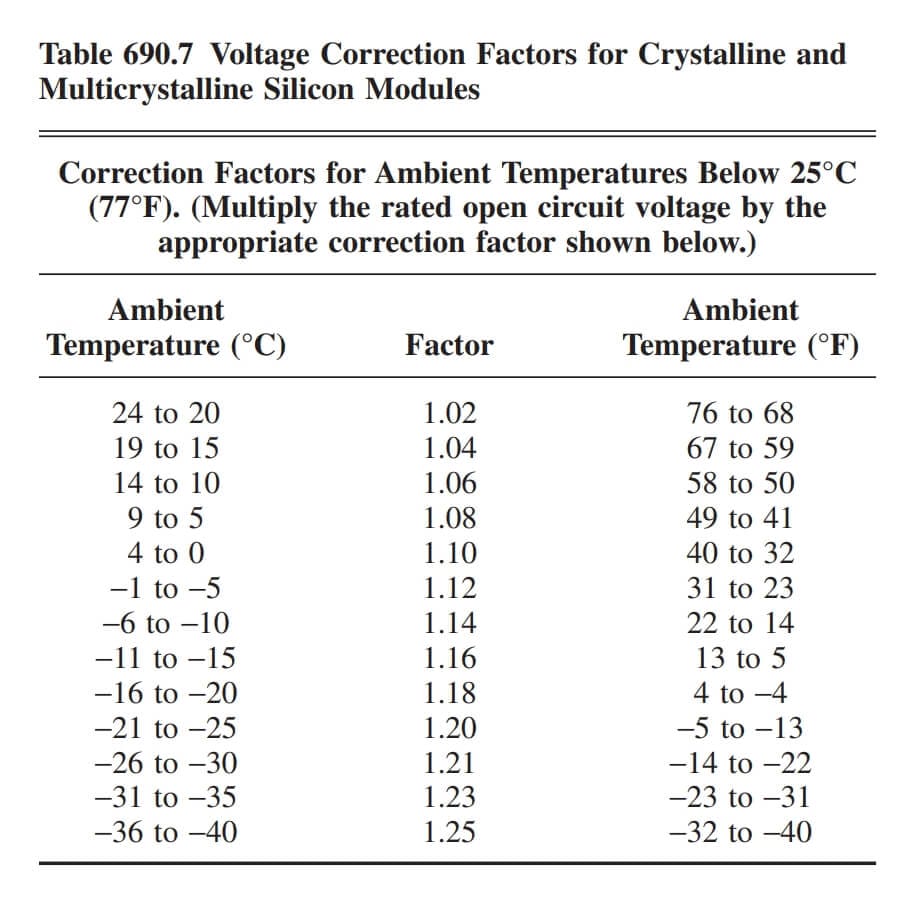
For example, if the coldest temperature in your location is between -31°C and -35°C, you need to take the factor 1.23 to multiply by the voltage of the solar panel. Then, you will get the voltage that can be used to calculate for your system.
Voltage
For example, our solar panel array uses 3 panels in series with 46.2Voc, and the coldest local winter temperature is -37°C(factor 1.25). Then we get the actual voltage of the solar panel array is
46.2 x 3 x 1.25 = 173.25V
So the rated voltage of our MPPT should be larger than 173.25 V
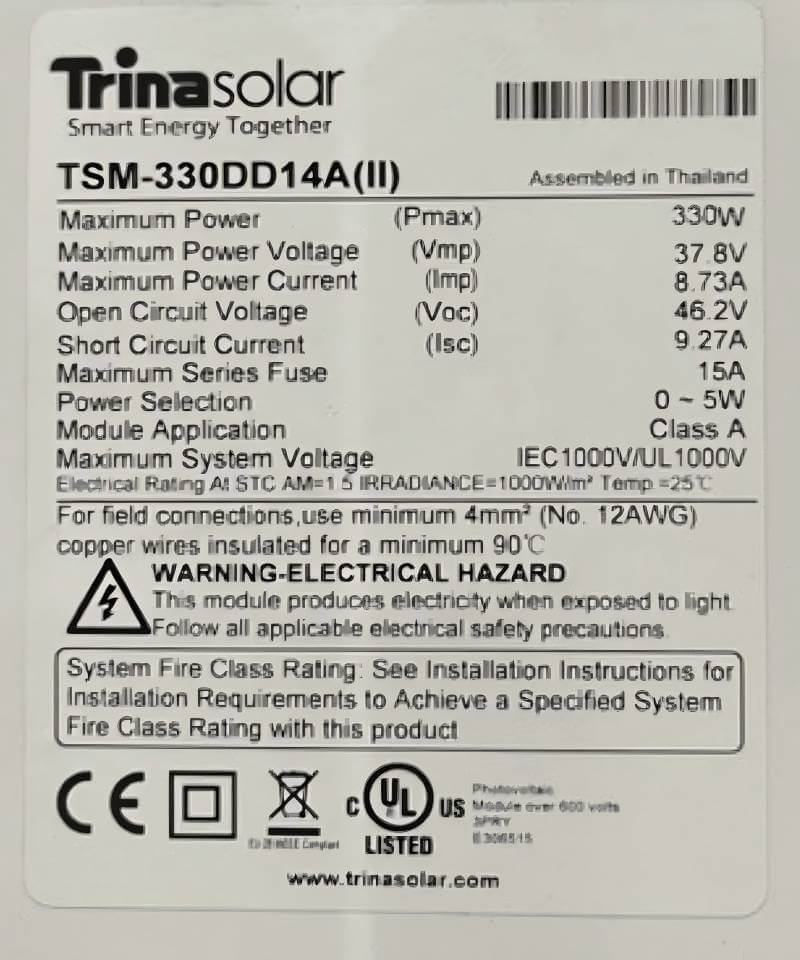
Current
If we use the 1 Trina solar panels, 12v battery bank, and MPPT in our system, what current load capacity should we choose for this MPPT?
The simple answer is that we can use the charging voltage of the battery bank to divide the watts of solar panels. (the formula is: total solar array watts / charging voltages = current load capacity of MPPT)
For a 12V battery bank, the charging voltage should be 14.4V, 28.8V for 24V batteries, and 57.6V for 48V batteries.
Step 1: Calculate the total wattages of the solar panel; we find the 37.8Vmp and 8.73Imp from the nameplate
So, its rated power is 37.8 x 8.73 = 330W
Remember the low temperature will increase the voltage, so we multiply by the 1.25 safe factor
330 x 1.25 = 412.5 W
Step 2: take the total wattage to be divided by the charging voltage 14.4V
412.5 / 14.4 = 28.65 A
Then 30A MPPT will be good to go.

